Turn a photo subject into a custom cookie cutter
Photo-to-cutter conversion is useful when your starting point is a pet, object, drawing on paper, or product photo. CutterForge uses AI to optimize the photo into cutter-friendly line art while keeping recognizable details, then previews the cutter before STL export.
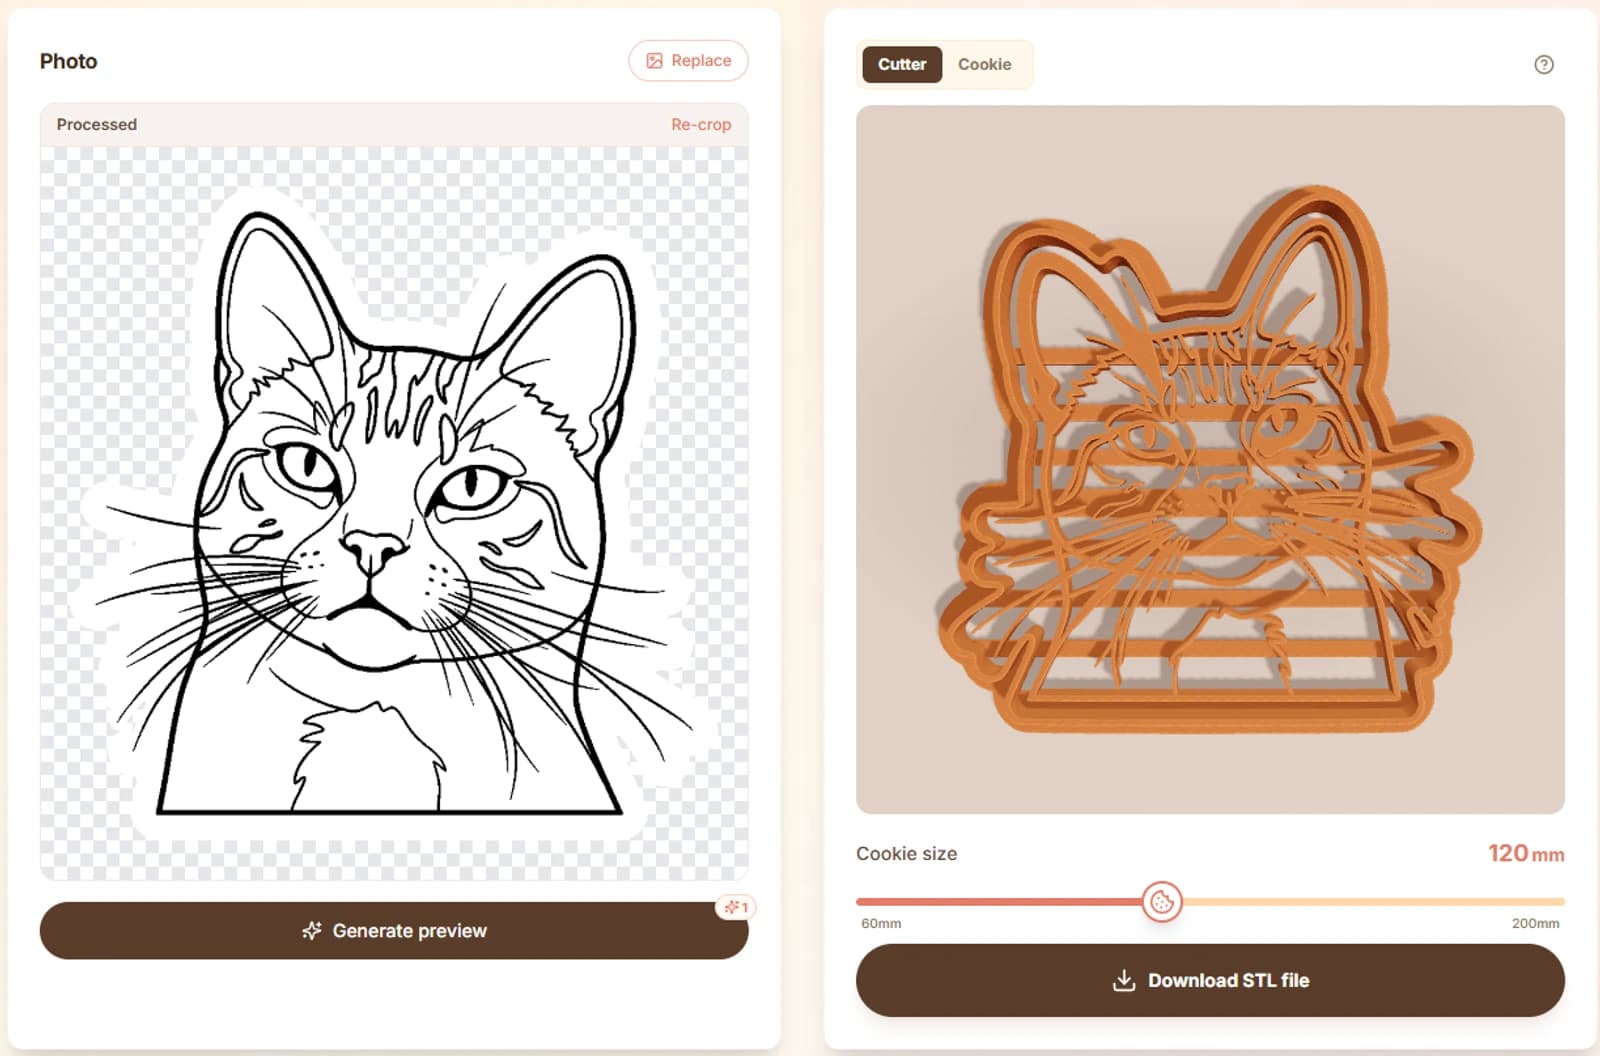
Built for the real path from idea to cookie cutter.
Use photo mode for pets, toys, products, sketches, and objects where the source is a real picture and needs AI cleanup before becoming cutter artwork.
CutterForge simplifies the photo into a cleaner design while preserving the details that make the subject recognizable. You choose a strong input photo and review the result; the tool handles the conversion workflow.
Use the CutterForge preview to judge whether the cutter is readable at the selected size. If the subject feels too busy, use a clearer photo or crop closer before exporting.
Four steps, then a file you can print.
- 01
Choose a photo with one clear subject and good lighting.
- 02
Crop away background clutter so AI can focus on the subject.
- 03
Let CutterForge optimize the photo into cleaner cutter-ready artwork.
- 04
Review the cutter preview and recognizable details.
- 05
Export the STL and check it in your slicer.
Useful for more than one shape.
What this workflow produces
Example input
A well-lit photo of a dog face, toy, flower, or product against a plain background.
Example output
An AI-optimized cutter design based on the subject silhouette, with recognizable detail preserved where it helps the cookie read clearly.
Export details before you print
Files you get
- STL cutter file
- Preview thumbnail
- Saved project
Inputs supported
- JPG photos
- PNG photos
- Cropped product photos
- Photos of sketches
Slicers and printers
STL exports can be prepared in Bambu Studio, PrusaSlicer, OrcaSlicer, Ultimaker Cura and similar slicers for printers such as Bambu Lab, Prusa, Creality, Anycubic, Elegoo.
Start at 1.0-1.2 mm for photo-derived cutters because natural silhouettes often have more curves and narrow areas.
Printing tips
- Use a plain background and strong lighting.
- Crop to one subject before uploading.
- Increase size if the subject has important small features that should remain recognizable.
Limitations to know
- Busy backgrounds make it harder for AI to focus on the subject.
- Shadows and fur-like textures may need cleanup or simplification.
- Photo mode preserves recognizable cutter detail, not every photographic texture.
AI, image upload, or text mode?
Use AI when
Use AI prompt mode if you do not have a photo and want a new generated design from words.
Use image upload when
Use image upload if you already have clean line art, a logo-style drawing, or a transparent PNG.
Use text mode when
Use the text tool for names or labels to add alongside a photo-inspired shape.
Avoid weak cutter files
Using a photo with multiple subjects.
Keeping the background instead of cropping tightly.
Printing a detailed photo cutter too small.
Expecting texture, shading, or fur to become clean cutter geometry.
Common questions
Can I turn any photo into a cookie cutter?
Not every photo works well. Clear, simple photos with one subject and strong contrast produce better cutter geometry.
What photo background is best?
A plain light or dark background that separates clearly from the subject is best.
Will the STL include photo texture?
No. CutterForge focuses on cutter geometry, so photographic texture and shading are simplified.
Can I use a pet photo?
Yes, but crop to the face or silhouette and choose a photo with clear edges.
When should I use AI instead of photo upload?
Use AI prompt mode if you do not have a source photo. If you have a real pet, object, or product photo, use photo mode so CutterForge can optimize that specific subject.
Which slicer should I use?
Common slicers such as Bambu Studio, PrusaSlicer, OrcaSlicer, and Cura can open STL files.